WRITTEN BY WOODSIDE DIRECTOR OF TRAINING, JOHN BEANE
MASTERING THE KETTLEBELL SWING
There is a saying that we often apply to training philosophy in the wellness industry, “methods are many, principles are few.” The original quote from Harrington Emerson reads, “As to methods, there may be a million and then some, but principles are few.” In the context of training these principles include progressive overload, specificity, adaptation, individualization, recovery and reversibility. As for the methods, there are too many to list here. Having said that, one of our favorite methods to nail several of the principles listed above is kettlebell training. In this article we are going to be discussing the kettlebell swing with the goal of giving you the safest, most effective entry to incorporating them into your program.
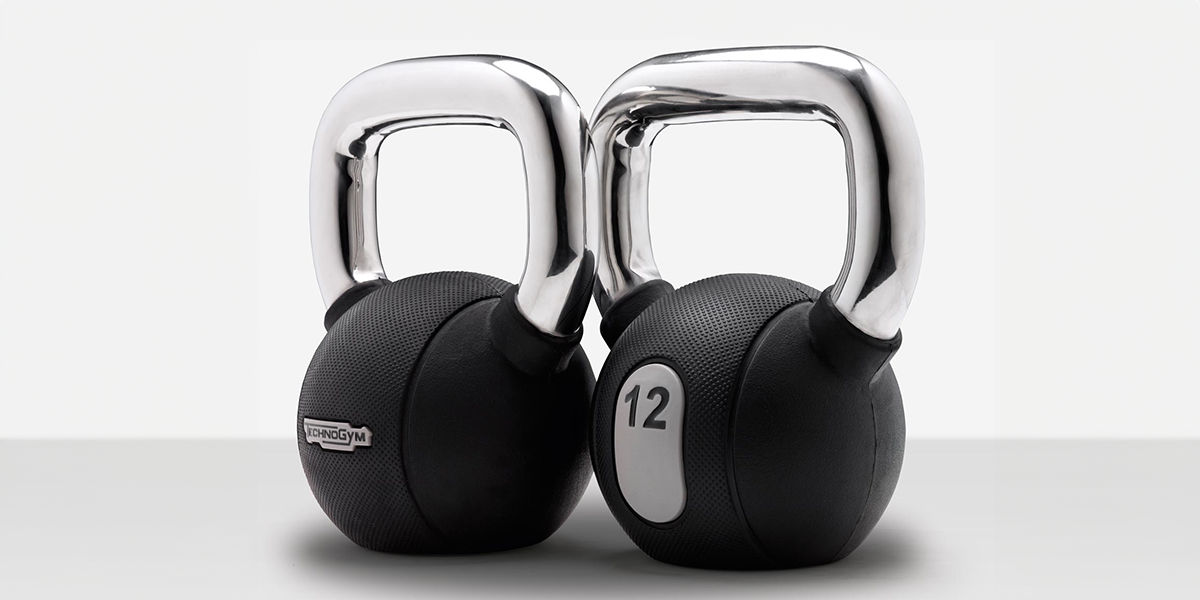
While up for debate, it is thought that kettlebells have their origin in ancient Russia, where importance was placed on physical strength, endurance and furry hats. The first recorded mention of the word girya, meaning a traditional Russian weight made of cast iron, was in a 1704 Russian dictionary. It looks like a cannonball with a handle, or a teapot without the spout, hence the name “kettlebell” in English. It would be considered a crime to write about kettlebell training without mentioning Pavel Tsatsouline. Pavel is credited with popularizing the kettlebell in the West through media, instruction and by founding the RKC (Russian Kettlebell Certification). In 2012 he left RKC to start Strongfirst. Strongfirst is considered the gold standard organization for certification and training in the kettlebell world. Stongfirst is our go-to for all things kettlebell here at Woodside and the fundamentals discussed in this article are based on the Strongfirst philosophy. We like to teach the swing as our first go-to for ballistic kettlebell training, but there is more to the process than grabbing a bell and jumping right in. We are hopeful the information presented here will help you begin your journey into kettlebell training.
There are several types of kettlebell swings – the American Swing, which is used quite a bit in CrossFit, Single Arm Swings to begin working on transitions to complexes, Double Kettlebell Swings to challenge technical ability and a bunch of other ones that exist to make you look cool. For the purposes of this article, we are going to focus on the traditional “Russian Kettlebell Swing.” There are many factors that go into performing the swing, but if the set up isn’t successful it becomes extremely difficult to recover your form and get the full benefit of the work you’re putting in. We teach these fundamentals to our Training clients here at Woodside, and perfect the swing given that the mechanics of the movement translate to the other kettlebell fundamentals, which includes the Clean and the Snatch among others. Below you’ll find the benefits of the swing, how to set up for the swing, programming recommendations and a few sample protocols that utilize the swing. As always, if you have any questions please don’t hesitate to contact us.
BENEFITS OF THE SWING
- Conditioning
- Grip Strength
- Power
- Program Novelty
- Instant Street Cred
SETTING UP + PERFORMING THE SWING
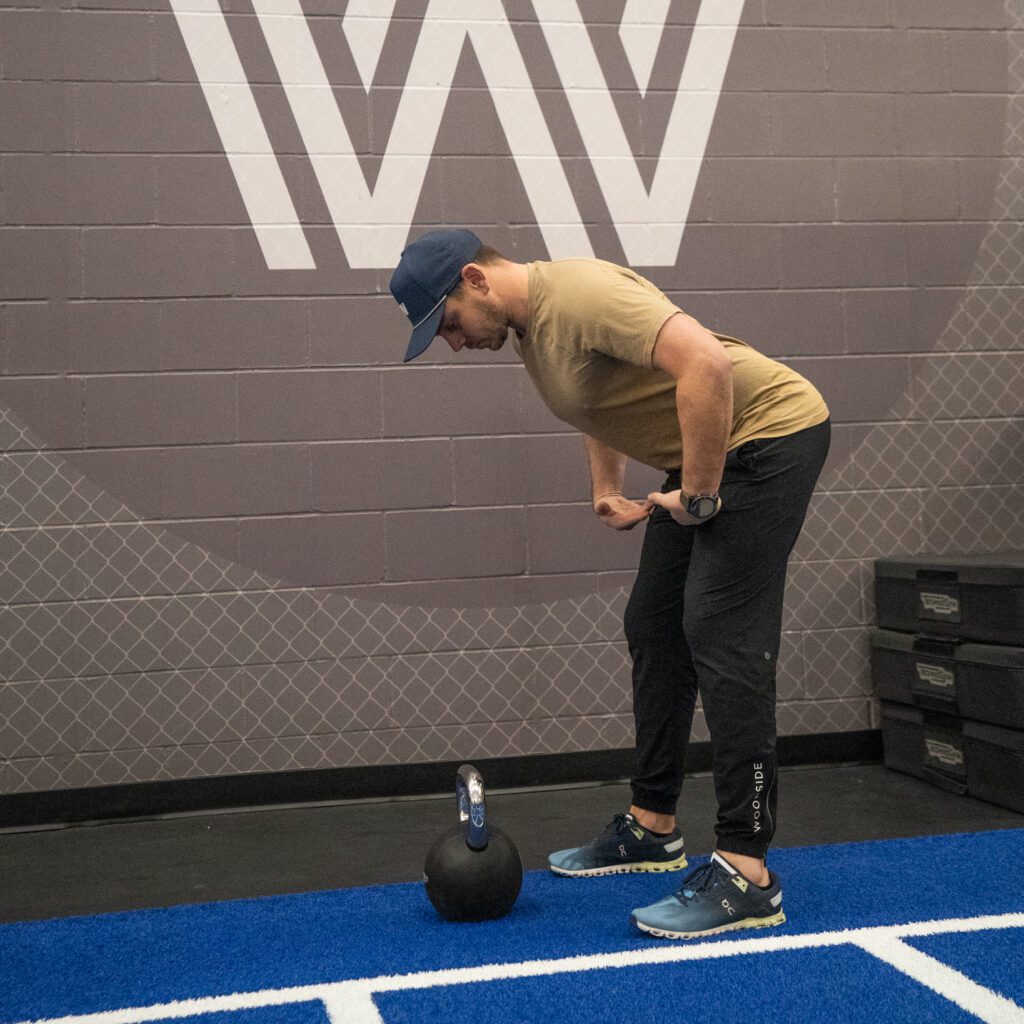
STEP 1 | THE HINGE
Place the kettlebell on the floor just in front of your feet and stand with feet slightly wider than shoulder width. Draw your elbows back so your shoulder blades pinch together. This creates ideal posture and is often referred to as having a proud chest. Notice your back muscles engaging and keep this shoulder position throughout the exercise.
*It’s important to note that you don’t want to exaggerate this position and drift too far into extension…even if it’s just for Instagram.
Now bend your hips. You can make what’s called the hand sandwich by placing your hands into the crease of your hips to cue you to move only from the hips and limiting motion of the spine. Bend until you feel a stretch in your glutes and hamstrings (we call this anchoring) and your fingers can barely reach the kettlebell handle. If you’re keeping the proud-chest position the top of your chest should still be visible from the front.
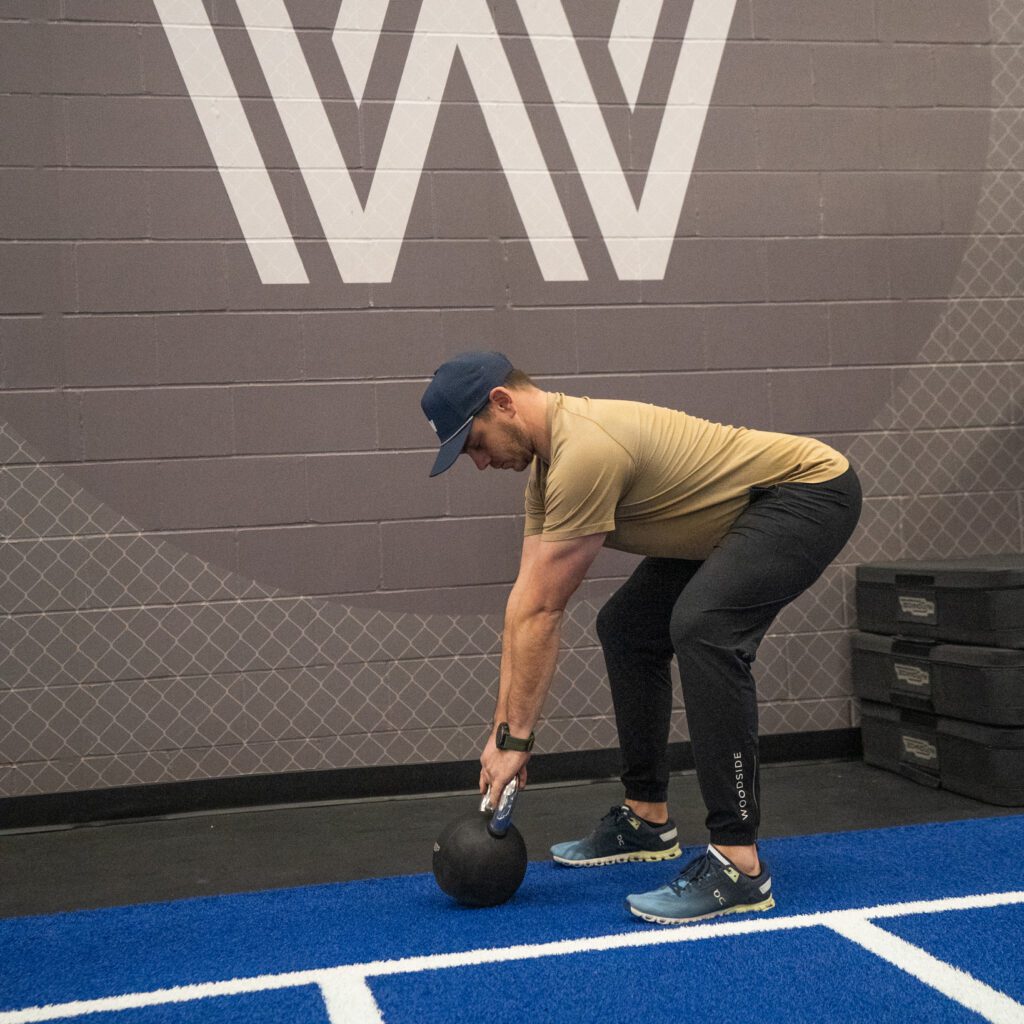
STEP 2 | ROOT + WEDGE
The kettlebell handle should be directly under your eyes. Reach to grasp the handle—it’s OK if you must lower your hips a little further to do so, but don’t round your back or shoulders. The term for this is rooting, which means developing a solid base of support. Now think about tucking your shoulder blades into your back pockets, which will draw your shoulders down and prevent any shrugging. Imagine bending the kettlebell handle in half and you will most likely feel your Lats engage. Drag the bell back a bit—not enough to move its position on the floor, but enough to feel your back and hips coiling up like a spring. This is known as a wedge – as in, you’ve wedged yourself into a tight position to begin the swing.
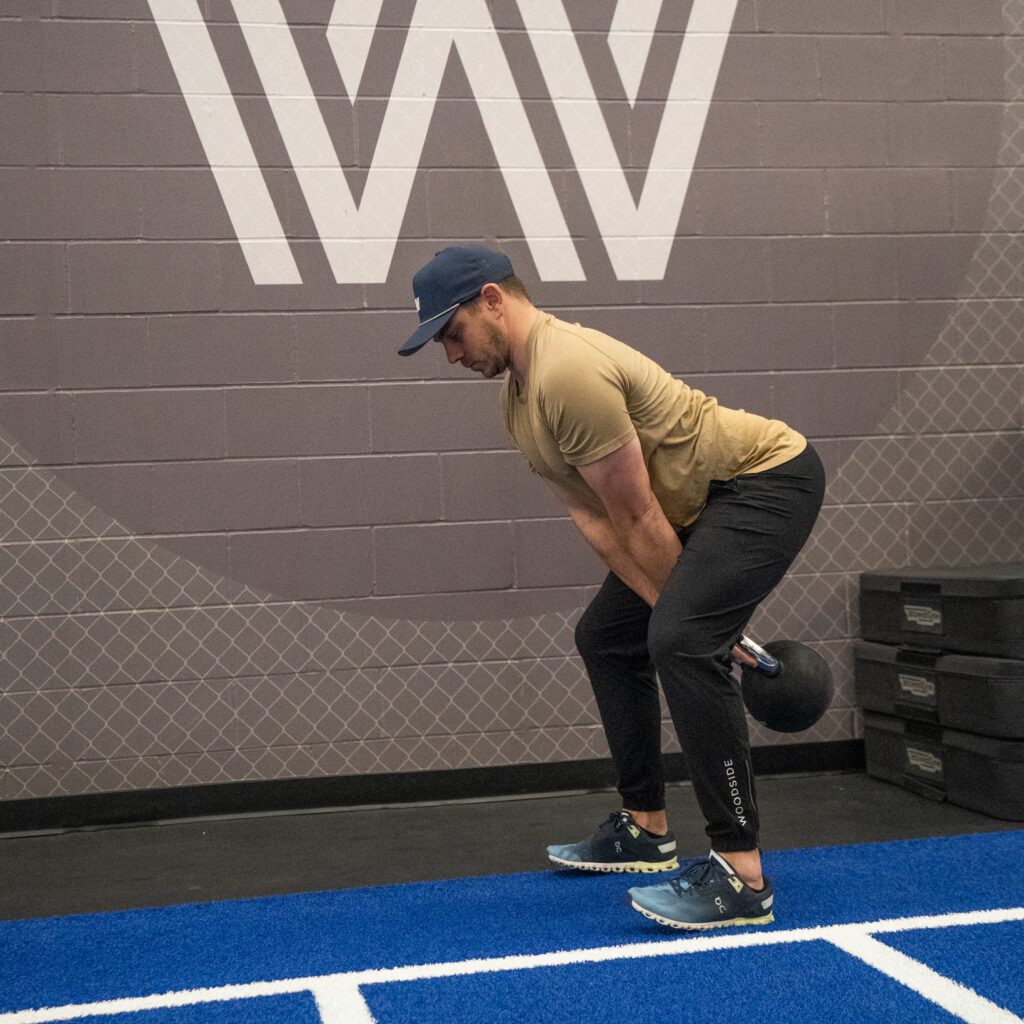
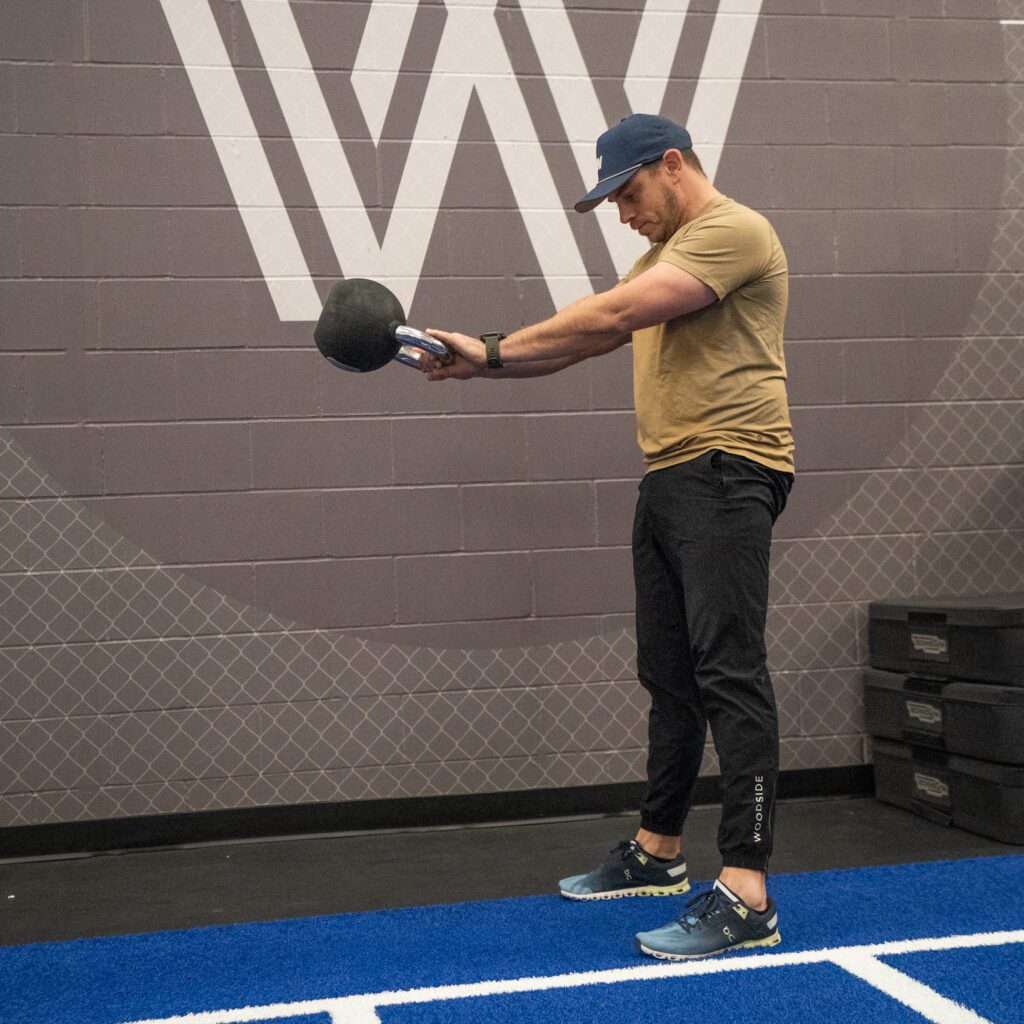
STEP 3 | HIKE
Now you’ll put the swing into motion. Hike the kettlebell back as if it were a football, aiming for the triangular area formed by the space between your knees and your crotch. Think about pulling the weight back between your legs, not bending forward at the waist. When the weight hikes back, your forearms should lightly touch the inside of your thighs. If you were watching yourself from the side, you’d see the bell pass through the area where Hamstrings and Glutes meet.
STEP 4 | DRIVE + FLOAT
As the weight swings back from between your legs, drive your feet into the floor and stand tall, locking out your knees. This will cause the kettlebell to swing up to shoulder level and bring your trunk to neutral. When performed correctly, the kettlebell will feel weightless at the very top of the movement, the “float”. As the weight swings back down, think about catching it and absorbing the momentum with your whole body by bending your hips to accommodate it. Then begin the next rep. If all else fails think of the swing as doing a granny free throw, except you’re throwing a cinder block and catching a water balloon. On the way down picture yourself catching a water balloon. Our favorite cue to use is, “Hips drive and Hands guide.”
“Don’t train until you get it right – train so you can never get it wrong.”
Brandon Hetzler, StrongFirst Certified Senior Instructor
PROGRAMMING RECOMMENDATIONS
- Include movements specific to the swing in your warmup. For example, Bridges, Dowel Hinges, Plank variations, etc.
- Determine your session goal and let that dictate the resistance. If you can safely swing a 40KG bell, then try using the 32KG for power and a 24kg for conditioning as an example.
- Make sure your recovery strategy is aligned with your session goal. For power you may want to prioritize the swing and have it earlier in your session and for conditioning you may be able to use your swings as a finisher because the loading is light enough.
- Use the “Goldilocks” strategy for bell selection. Choosing a weight too light can be just as risky as choosing one too heavy. You should be able to swing the bell under control while hitting the check points of proper form, appropriately timed breath and power output.
SAMPLE PROTOCOLS
50 Rep EMOM (Every Minute On the Minute)
- Perform 5 two-handed swings and rest completely for the rest of the minute. Your goal here is to generate the same amount of force with each rep of the workout. You’ll feel like you can do more, but we are trying to stay away from fatigue as much as possible.
5 to 40 Protocol
- 10 Rounds
- 5 Swings
- 10 Push Ups
- 20 Air Squats
- 40 Second RKC Plank
*This can also be performed at half rep counts but the swing should remain at 5 reps.
Pavel’s “Simple and Sinister” Modified
- 5 Rounds
- 5 Swings on the left arm, snatch the bell overhead on the last rep, perform a reverse get up on the left side. Once you return to the standing position repeat the same on the right side. The goal is to perform the protocol without letting the bell touch the ground. This is the “Simple,” once you get to ten reps on each side it is “Sinister.” Cheesy name…awesome challenge!
Our Training team can help you incorporate Kettlebells into your workout routine. To learn more click here or email us.